 The RO installation is the process of installing and connecting a reverse osmosis system to the home water line. RO installation may be challenging, as it involves connecting the filter to the water line and drain line. The possession of certain tools will also be necessary.
Common installation mistakes may affect the way the RO system works. Installing the reverse osmosis system in the wrong location may affect the water flow and failing to secure the connections may result in leaks. The action to mount water supply feed also needs attention, as improper attachment may cause leaking.
To prevent potential problems from happening, the proper installation tools and materials are necessary. A reverse osmosis system installation tools include cutters, a power drill, screwdrivers, and wrenches. An installation manual may be followed, but ideally, the person installing it should also have basic plumbing knowledge.
The steps for installing the reverse osmosis system are as follows:
- Determine the Installation Location for the RO System
- Close the Water Valve
- Connect EO to the Water Line
- Drain Line Connection
- Install the Faucet
1. Determine an Installation Location for Reverse Osmosis System
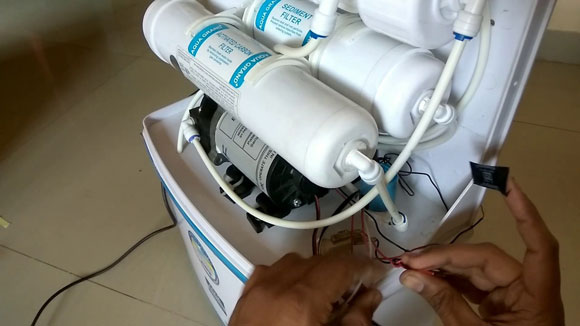
 Before installing, it is necessary to find the place and make sure that there is enough to fit the reverse osmosis system. RO systems may be installed in a variety of places, such as in the basement, in the kitchen, or in the bath. Reverse osmosis systems may be added under the sink or attached to the faucet.
In most cases, a whole-house reverse osmosis system is installed in the basement or the utility room, as it is much easier to access this way. Also, it takes no kitchen space. For point-of-use reverse osmosis systems, the most common option is to install them underneath the sink. This position will waste less kitchen space and make it easier to access filtered water.
2. Close the Water Valve
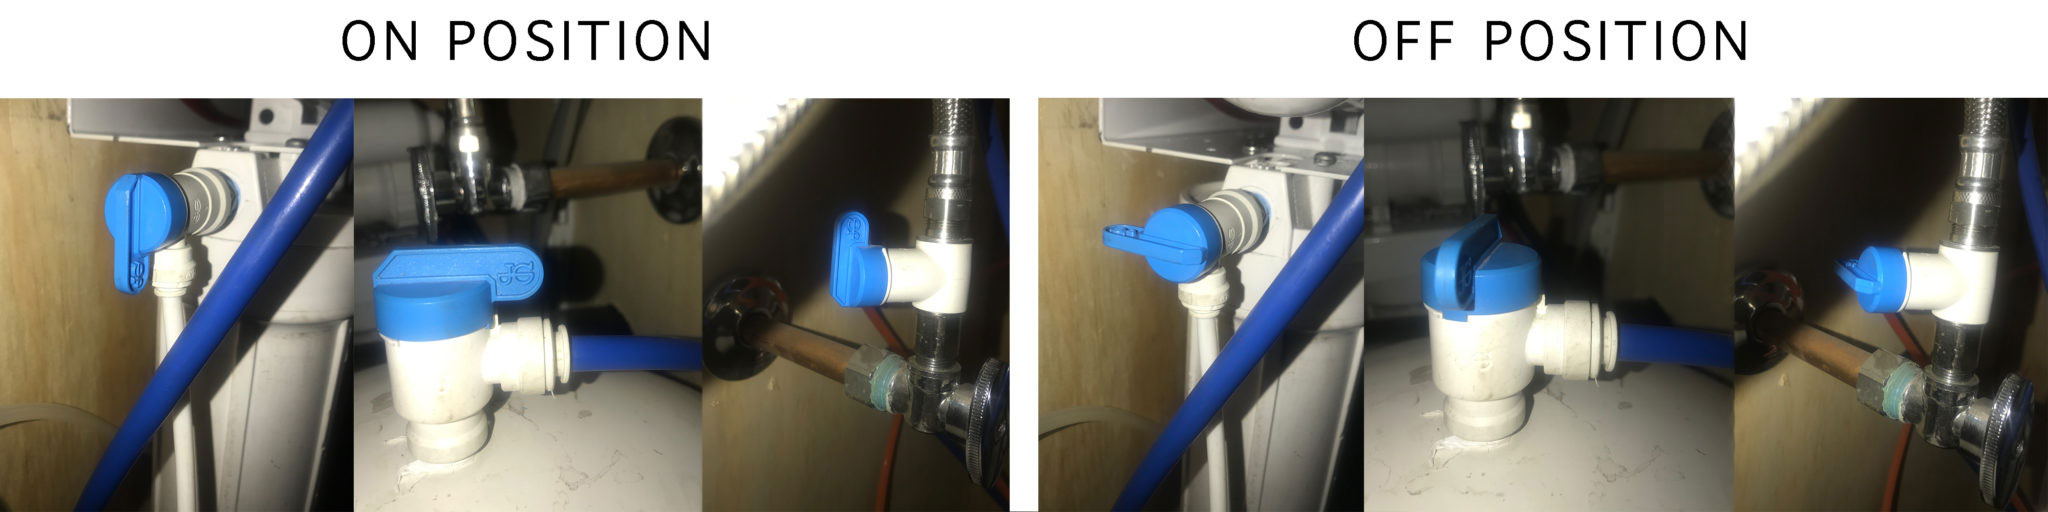
The water valve is what keeps the water from splashing all over when you are installing the new RO filter. You must close the cold-water line off as you are connecting the system, as it disconnects the water from passing through the pipes. It will allow you to connect the drain line adapter without the risk of flooding the entire room.
When installing the reverse osmosis system underneath the sink, close the valve connected directly to the sink water line. Most modern systems should have this type of valve. If it is not present or is somehow inoperable, the whole house water supply needs to be shut off.
Once the water has been disconnected, it is necessary to relieve the pressure from the pipes. This can be done by turning the cold-water faucet on. The action is essential, as it will prevent any water and pressure-related accidents.
3. Connect RO to the Water Line
 When connecting the RO system to the waterline, there are a few options to keep in mind. Users may go with the standard saddle valve option or the optional route that uses an EZ adapter.
- Saddle Valve: Locate the cold-water line and attach the saddle valve clamp. Adjust the pipe clamp until it efficiently fits the pipe contour. Make sure to tighten the bolt during this process, so that the saddle valve is properly attached to the water pipe. Also, do not over-tighten it, because it might damage the pieces.
- EZ Adapter: To prevent any potential leaks, it is recommended for Teflon tape to be used. Take a 90-degree needle valve, and then attach it to the feed adapter.
Two more installation options open up, depending on whether flex line or solid line installation is used.
- Flex Line: For the flex line route, users must disconnect the sink flex line and proceed with installing the feed adapter. Then, they must reconnect the adapter to the flex line, and attach the sink faucet.
- Solid Line: For the solid line route, users must disconnect the sink line, cutting off around 3/4” from the line. Once that is done, they can install the adapter. Then, they must reconnect the feed adapter and the solid line, positioning it so that it may be attached to the faucet.
This step should not be skipped, as it involves installing the actual reverse osmosis system. The water will pass through the valves, adapters, flex lines, or solid lines, after which it will send the purified water into the faucet.
4. Drain Line Connection
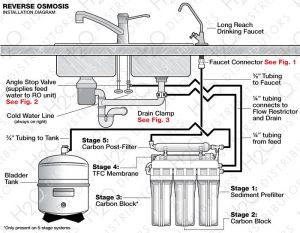
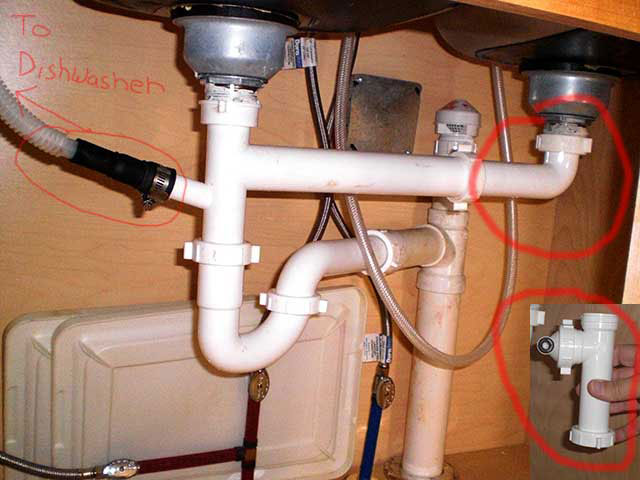 The drain line connects the RO system to the drain. Due to the high filtering power of the reverse osmosis system, a fair amount of wastewater is produced. The drain line directs that wastewater into the drain line, which is found underneath the sink.
The drain saddle valve must be installed somewhere above the J-trap or the P-trap of the drain line. Ideally, the drain saddle should also be installed at a distance from the garbage disposal. Make sure that the drain saddle is installed on a horizontal water line. Many people make the mistake of installing it on a vertical water line, which may lead to a fair amount of noise.
Once the installation spot has been determined, create a hole in the pipe using the drill. For this part, a drill bit with a ¼” diameter should be used. Afterward, attach the saddle and bolt it in its place on the pipe. The wastewater will not flow into the drain line.
5. Install the Faucet
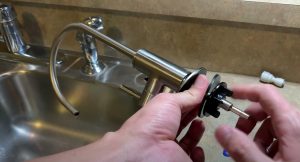 Most reverse osmosis systems come with their own faucet. Users may want to consider using a new faucet and not the old one, as it will offer access to clean, drinking water. Old faucets may gather rust and other contaminants, which is why it is an essential step that should not be skipped.
Depending on the circumstances, a new hole in the sink may be required to fit the new faucet. By installing it in an unfitting hole, it may grow unstable and lead to leaks. Make sure that the faucet is tightened properly, as failing to do so may cause the faucet to leak.
Hole drilling processes will still require a fair amount of preparation and caution. For instance, if the kitchen has a porcelain enamel sink, it may easily be chipped if proper control is not used. Metal chips may also escape when drilling through a metal sink.
Once the hole is ready, insert the faucet stem into it. Make sure that the body of the faucet and base are positioned above the sink. Use the base nut and star lock washer to secure the faucet on the sink, in the desired direction.
Do You Need a Plumber for RO Installation?
Yes, you need a plumber to install a reverse osmosis system if you are worried that you do not have the right tools. Knowledge and belief in your skills are also important. You do not need a plumber if you have the tools and are capable of following a set of instructions. Reverse osmosis systems will always come with their own instructions.
What Is the Equipment Required for Reverse Osmosis System Installation?
The equipment that is required for a reverse osmosis installation is listed below:
- Box Cutter (Optional): Some reverse osmosis systems are difficult to take out of their box. Filters are also sensitive, so users need to be careful. A box cutter will help make the removal process smoother. It will also be useful for cutting through the plastic tubing.
- Philips Head Screwdriver: This tool will be necessary to make any potential attachments. It will be used to attach the reverse osmosis system in its place.
- Power Drill: Depending on the reverse osmosis system, it may be necessary to drill a few holes in the wall. In this case, a power drill may be necessary. It will also help with the installation of the saddle valve and the faucet. Get ¼” and ½” drill bits for the drain saddle valve and the RO faucet respectively.
- Adjustable Wrench: Wrenches are used to tighten any potential valves and screws. This is necessary in order to prevent any leaks.
What Are the Materials That Are Required for RO Installation?
The materials required for RO installation are listed below:
- Teflon Tape/Plumber: This material is necessary to seal the connections of the reverse osmosis system. The material will prevent any potential leaks.
- RO Membrane: The RO membrane is the most important material. It is the part of the reverse osmosis system that will keep the contaminants out.
- Hoses and Tubes: Connection hoses and tubes are usually included in the RO system package. If they are not, they should be procured.
Is Installation of RO Harder than Ionization Water Filtration System?
No, the installation of RO is no different than installing a water filtration system. The installation of an ionization water filtration system goes through the same steps and materials, giving it the same hardness level. Installation steps are the same, but if the house has very hard water, it may require installing a bigger ionization tank. The connection steps are the same, the only difference lies in the weight of the system.
Does the Installation Method of RO Affect Its Efficiency?
If the RO system is installed correctly, the efficiency of the reverse osmosis system will not be affected. If the RO system is installed incorrectly, the efficiency may decrease. This is why understanding how does RO works is essential, as each piece is connected. The valves and connections must be tightened properly so that there are no potential leaks. Wrong membrane installation may also cause the system to run without stopping, wearing down the RO filter.