To install a Brita water filter, one needs to follow the basic 4 steps as recommended by the manufacturer. Brita water filters do not need any special equipment, tools, or skills for installation but they can just be screwed onto the faucet. Hence, a Brita water filter is easy to install even for a beginner for as long as one clearly follows the installation instructions from the manufacturer. One of the biggest advantages of the Brita water filter installation is that the product comes with several adapters that enable the fitment and installation of the water filter to non-standard water faucets.
Some of the common mistakes that are made in the installation of the Brita water filter include:
- Failing to attach the Brita water filter system to the tap.
- Over-tightening or tightening the fitment of the Brita base system using pliers.
- Running hot water through the Brita water filter system because hot water damages the filter such that it will not be able to work properly.
- Using the wrong adapter for attaching the system to the tap, which can result in water leaks at the connection between the system and the tap.
- Failing to install the Brita water filter system correctly to the tap, resulting in water leaks at the connection between the system and the tap.
- Pushing the filter cartridge release button whilst the Brita water filter system is working.
- Trying to fit the Brita water filter to a faucet with a built-in spray feature at the end of the faucet.
There are 4 stages for installing a Brita water filter. These 4 stages include 17 steps to follow while installing the Brita water filter to the faucet. The 4 stages of installing the Brita water filter are as follows:
- Removal of the aerator from the tap: Remove the aerator from the faucet by unscrewing it and any original rubber washers from the faucet. If it is difficult to remove the aerator, one can use a dry towel to tightly grip the aerator. Any dirt, scale, or rust build-up is cleaned off.
- Determination of whether an adapter is needed and the selection of the compatible adapter: The general principle is that if the tap has threads outside, it is most likely that there is no need for an adapter and if the threads are inside, an adapter will be needed. The Brita Water Filter comes with different adapters and corresponding washers such that one needs to choose the correct adapter for the tap to be fitted with the Brita Water Filter.
- Attachment of the base system to the faucet: Where an adapter is not needed, one needs to position the base of the Brita system such that the filter cup is on the left side of the faucet and the filter replacement indicator is facing the direction of the person installing the filter. One needs to twist the mounting collar onto the faucet and then tighten it by hand until snug. Where an adapter is needed, the adapter is first fitted to the faucet and then the base of the Brita Water Filter is then fitted onto the adapter as described in the case where no adapter is needed. One should make sure that it is level, should not be forced to fit, should not be tightened using pliers, and should not be over tightened.
- Insertion of the filter cartridge into the system: One needs to insert the filter cartridge into the filter cup and lightly pull the filter out making sure that it is tightly fitted. The process of inserting a new filter cartridge automatically resets and activates the filter replacement indicator. The installation process becomes completed and one needs to turn on the faucet and let the water run for 5 minutes to remove any carbon dust and to activate the filter.
The 17 steps that are involved in the installation of the Brita water filter are as follows:
1. Prepare the faucet for the Brita Water Filter
The person installing the Brita water filter needs to inspect the state of the faucet to be fitted with the Brita water filter. It is important to check if the faucet is compatible with the installation of the Brita water filter because faucets that have an in-built spray feature at the outlet are not compatible with the Brita water filter. The common mistake made during this phase is to fail to identify that a faucet has a built-in spray feature and hence, is not compatible with the Brita water filter.
2. Remove the aerator from the faucet
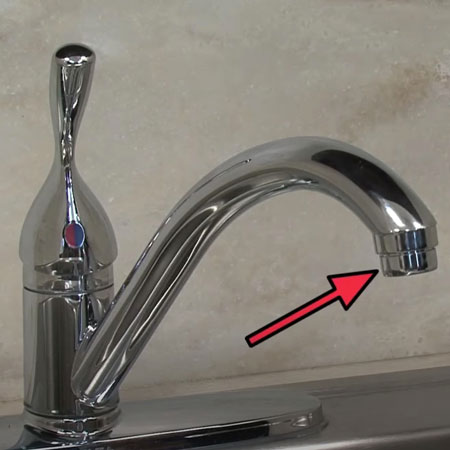 When removing the aerator component of a faucet that will be fitted with the Brita water filter, the aerator is unscrewed in a clockwise direction until it gets detached from the faucet. Any original rubber washers from the faucet are also removed. If it is difficult to remove the aerator, one can use a dry towel to tightly grip the aerator so as to remove it without any problems or without causing any damage to the faucet or the aerator itself. This step is important because the base of the Brita water filter cannot be fitted onto the faucet without removing the aerator. The common mistakes encountered during this step include not removing the rubber washers after removing the aerator which can make the fitment of the Brita water filter system difficult. Another common mistake is trying to remove the aerator in the wrong direction (screwing it anticlockwise) and thus, making it tighter and more difficult to remove.
3. Clean off any build-up for Brita water filter installation
It is important to remove and properly clean any dirt, scale or rust build that might have accumulated on the inside part of the faucet after the removal of the aerator. This is necessary because it will prevent the accumulation of unwanted residues in the Brita water filter system after its installation. One can ensure that build-up has been properly done by thoroughly cleaning the inside of the tap/faucet using a damp cloth or a toothbrush and opening the faucet so that water freely runs out, rinsing out any residues that might have remained on the inside of the tap. The common mistake that can be made is not thoroughly cleaning and rinsing the inside of the tap at the outlet.
4. Understand the necessity of an adapter
Understanding the necessity of an adapter is very important because it determines whether an adapter will be needed or not during the installation of the Brita water filter so that the base system can be successfully connected to the tap. The general rule that is used for someone to understand whether an adapter is necessary or not is that if the tap has threads outside, most likely there is no need for an adapter and conversely if the threads of a tap are inside, an adapter will be needed. In instances when an adapter will be used, the type of adapter to be used needs to be identified because there are different types of adapters. The common mistake made during this step is the failure to understand the general rule of whether an adapter is needed or not. and also, the failure to check the adapter that will be needed for the installation.
5. Attach an adapter to the Brita water filter
 The person doing the installation needs to connect the compatible adapter to the Brita water filter. Attaching an adapter to the Brita water fılter is essential as it will enable the connection of the Brita water filter to the faucet. One can make sure that they have found the right adapter by testing. One common mistake people make while attaching an adapter to the Brita water filter is to force the fitment of an adapter that might not be the correct one resulting in damage to the threads and eventually poor fittings at connections.
6. Determine the need for the adapter set
It is vital to establish if there is a need for an adapter set to connect the Brita water filter to the faucet. If there is a need, one needs to establish the type of adapter that is compatible. This is linked to the selection of the appropriate washer that is compatible with the adapter set.
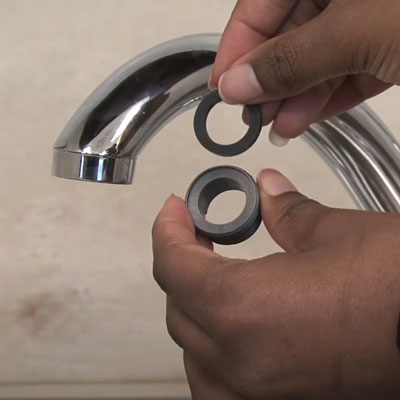
7. Place the washer into the adapter
 As there are different adapters, there are also different sizes of washers. It becomes very essential to use the correct size of the washer that corresponds with the adapter. A washer is fitted inside or in between a connection of the adapter and the faucet and serves the purpose of making sure that the 2 connections are properly and tightly sealed without resulting in any leakages. In this case, the washer is placed on the inside part of the faucet. When the correct washer has been used, it will fit perfectly on the outlet of the faucet. The common mistake that can be made when placing the washer into the adapter is not checking the correct size of the washer before fitting so that a wrong size of a washer might end up getting stuck on the inside part of the faucet.
8. Twist the adapter onto the faucet before attaching the Brita water filter
After the correct washer has been fitted onto the faucet, the adapter can be hand-fitted slowly to the faucet. This is achieved by screwing the adapter anticlockwise until snug. This will ensure that the connection is tightly fitted before the base system is fitted. It is important that the adapter is fitted whilst it is level to avoid having damaged threads and overall avoiding leakages at connections. The common mistakes made when fitting the adapter onto the faucet include using pliers to tightly screw the adapter and screwing the adapter without making sure that it is level and damaging the threads.
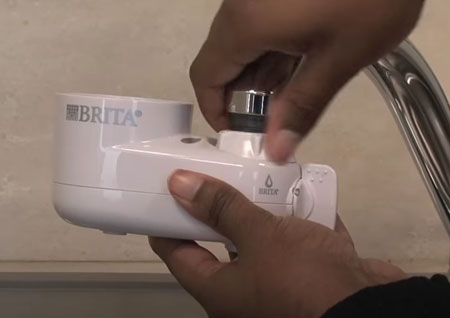
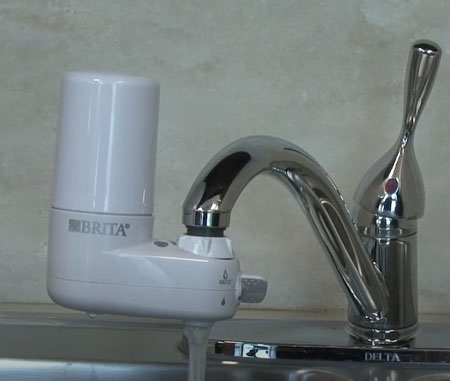
9. Attaching the Brita filtration system to the faucet and the adapter
The person installing the Brita filtration system needs to attach the base of the Brita water filter such that the filter cup is on the left side of the faucet and the filter replacement indicator is facing the direction of the person installing the filter. This will ensure that the installation is as per the manufacturer’s recommendation.
10. Position the base system of the Brita water filter beneath the faucet
 The base of the Brita filtration system needs to be positioned such that it is below the faucet. This is essential because the inlet chamber into the base system (at the strainer) will be directly connected to the outlet of the faucet so that water moves out of the faucet into the base of the Brita filtration system. One common mistake that people make when positioning the Brita water filter is not to verify that the base of the system is positioned such that it is level before it gets attached to the faucet. Consequently, there might be a mismatch and damage to the threads.
11. Twist on the mounting collar before inserting the cartridge
After the alignment of the base system and the faucet, one needs to twist the mounting collar located on the base system such that it gets fastened to the faucet or adapter on the faucet. One can tighten the mounting collar with the hand until snug. This is important so as to avoid damaging the threads and also to avoid struggling when it becomes necessary to remove the base system for maintenance purposes. The most common mistake made when twisting on the mounting collar is to over-tighten the mounting screw or to use pliers to tighten the mounting collar. This is not necessary as it will damage the threads and will make it difficult to unscrew the mounting collar when doing maintenance to the system.
12. Insert the filter cartridge into the filter cup of the Brita water filter
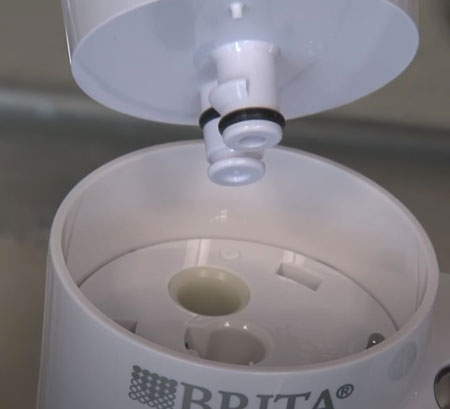 This step needs to be executed gently through one hand supporting the filter system and the other hand holding the filter cartridge and aligning the insert groove on the lower part of the cartridge with the filter replacement indicator in front of the filter cup. One needs to gently insert the filter cartridge into the filter cup. To double-check if the filter cartridge has been properly fitted one can gently pull the cartridge upwards and if it is properly connected, it will not come out. By inserting a new cartridge into the filter cup, it resets and activates the filter replacement indicator. Some people make the mistake of forcing the filter cartridge into the system base and in a process ending up damaging the connection system.
13. Check the cartridge to make sure that it functions
This process of verifying if the filter cartridge functions are very important. Testing of the cartridge is done by adjusting the filter handle between the “filtered water” and “unfiltered water” positions such that the outlet discharging water also changes to discharge either the filtered water or the unfiltered water. Only cold water should be used when filtering water. As a rule, one should not run water above 380C or 1000F through the filtration system as this will damage the filter. One common mistake that people can make is to use hot water during filtering which damages the Brita water filter.
14. Flush out the new cartridge to make an experiment
Flushing out the new cartridge is achieved by turning on the faucet for 5 minutes. This process removes any carbon dust from the filter and activates the filter. This process is done using only cold water. Some of the common mistakes one can make when flushing out a new cartridge include flushing the filter for a time shorter than the minimum recommended time of 5 minutes such that carbon dust will remain in the filter, or flushing the filter with hot water.
15. Configure the Brita water filtration system settings
The configuration of the Brita water filtration system settings involves turning on the faucet for 5 minutes and letting only cold water run continuously during this period. This process will remove any carbon dust from the filter and activate the filter.
16. Monitor the indicator for the water filtration system of Brita
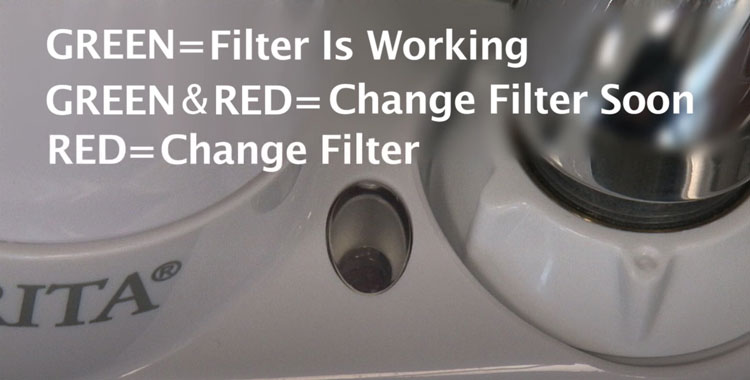 The Brita water filter system has a filter replacement indicator that alerts the user about when to get ready to change the filter cartridge and when the filter cartridge has reached the end of its life and needs immediate replacement. The filter replacement indicator regularly monitors the filter life and gives the status of the filter by illuminating 1 of 3 color codes at any given time, namely solid green when the filter is working, green and red when a warning is being served that the filter has about 2 weeks or 75 liters/20 gallons left before the filter cartridge reaches the end of its life and a solid red indicator which illuminates when the filter cartridge has reached the end of its life, has stopped filtering and need urgent replacement. The proper function of the indicator light and its regular checking is important to ensure that clean and safe water is coming out all the time and to know when to get ready to change the filter cartridge. Some of the mistakes people make include not regularly checking the indicator status so that they might only realize when the filter cartridge is finished and not keeping a spare filter cartridge for replacement purposes when the other cartridge has reached the end of its life.
17. Change the filter cartridge when it is necessary
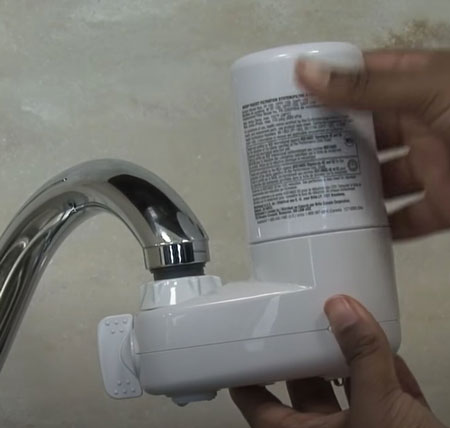
The replacement of a finished filter cartridge is a seamless process. When the filter replacement indicator appears solid red, one needs to turn off the water at the tap and then press the filter cartridge release button which is at the back of the filter cup. This disengages the filter cartridge at the filter cup and one can pull up the cartridge and dispose of it. To install a new filter cartridge, using one hand, one needs to support the filter system, and using the other hand hold the filter cartridge and align it into the insert groove. One then needs to gently insert the filter cartridge into the filter cup. To verify if the filter cartridge has been properly fitted one can gently pull the cartridge upwards and if it is properly connected, it will not come out. One mistake that can be done during the cartridge replacement is the forceful removal of the finished cartridge that can end up damaging the system.
How to Change a Brita Water Cartridge?
 The Brita water filter cartridge can be changed by following the steps below::
- Confirmation that the filter cartridge is finished: When the cartridge replacement indicator illuminates a solid red color then one knows that the water filter cartridge needs to be replaced.
- Removal of finished water filter cartridge: Turn off the water at the tap and then press the filter cartridge release button that is situated at the back of the filter cup to disengage the filter cartridge at the filter cup. One needs to pull up the filter cartridge and remove it from the filter cup before disposal.
- Installation of new water filter cartridge: Hold and support the base system from the bottom using one hand and with the other hand hold the filter cartridge and align it into the insert groove. Then gently insert the filter cartridge into the filter cup.
- Verification of proper installation of water cartridge: One can gently pull the cartridge upwards and feel if it will not come out. If the cartridge is firmly fitted, then it will have been properly installed.
- Flushing the water cartridge: One can flush the cartridge by turning on the faucet and letting the water run for 5 minutes to remove any carbon dust from the filter and activate the filter.
When to Change a Brita Water Filter Cartridge?
The time period under which a Brita water filter cartridge is due for replacement depends on the rate of water usage. When the Brita water filter cartridge is new, it can filter 100 gallons or 378 liters of water which is estimated to be around 4 months. The Brita water filter cartridge should be changed under the following conditions:
- Filter Cartridge Replacement Soon: The user will get a warning of the need to replace a Brita water filter cartridge soon when the cartridge can filter 20 gallons or 75 liters of water before the end of its life. This warning light is anticipated to switch on 2 weeks before the end of the life of the Brita water filter cartridge.
- Filter Cartridge Replacement Now: The user will get a warning of the need to immediately replace a Brita water filter cartridge because the filter cartridge will have reached its end of life. The Brita water filter cartridge will have filtered about 100 gallons or 378 liters of water.
- Early Brita water filter cartridge replacement: The Brita water filter cartridge might need an early replacement due to elevated sediment levels in the water undergoing filtration such that the outflow of water from the filtration system becomes low.
Is it harder to install a Brita water filtration system than Whirlpool?
No, it is not harder to install a Brita water filter compared to the Whirlpool water filtration system. In fact, it is easier to install a Brita water filter compared to all Whirlpool water filtration systems. This is because the Brita water filter system is installed as an extension to an existing ordinary faucet.
In contrast to the 5 different Whirlpool water filtration systems reviewed like the Whirlpool UltraEase Kitchen and Bath Water Filtration System, Whirlpool WHAROS5 Reverse Osmosis (RO) Water Filtration System with Chrome Faucet, Whirlpool WHADUS5 Under Sink Water Filtration System with Chrome Faucet, and the Whirlpool WHER25 Reverse Osmosis (RO) Filtration System with Chrome Faucet are mainly under-sink filtration systems which although can be categorized as DIY systems, actually need someone with plumbing or handyman skills for installation.
All the Whirlpool water filtration systems require tools like pliers, jaw wrench, screwdrivers, and an electric drill to undertake the installation whereas the Brita water filter system does not require any tool at all for installation. Four of the five Whirlpool filtration systems have an additional faucet that requires its own drilling and installation over the counter and gets linked to the under-sink filtration systems. This requires technical and plumbing skills and might require a plumber to install the filtration system. Overall, Whirlpool Water Filters require more handyman and plumbing skills, as well as tools for installation and therefore, are a bit harder to install compared to the Brita water filter system.
What are the Brita Water Filtration Products?
The Brita Water Filter products include the base system, the replaceable filter cartridge, and a packet with 2 faucet adapters and washers.
What are the similar installation processes to the Brita water filtration systems?
There are 2 main Brita Water Filtration Faucet Systems, namely the Brita Basic Faucet Mount System and the Brita Complete Water Filter Faucet System although each one of the faucet filtration systems has a variant that is sold with an extra filter cartridge. The faucet systems have mostly similar installation processes as described below:
- Removal of aerator: Since both water filters are faucet systems, they involve the removal of the aerator end of the faucet. They both involve the removal of the aerator first before installation.
- Determination of whether an adapter is needed or not: The base systems for both the Brita Basic and Complete water filtration systems will get screwed on the threads of the faucet. This needs an evaluation of whether an adapter will be needed or not by assessing the threads of the faucet. If the threads are outside, then an adapter will not be needed. In contrast, if the threads are inside, an adapter will be needed and will be screwed to the faucet after first inserting the washer until snug. Also, both filtration systems cannot be attached to faucets that have a built-in spray feature at the end of the faucet since it is not compatible with the connection of the mounting collar on the base system.
- Attachment of base system to the faucet: The base system is attached to the faucet by aligning the mounting collar directly below the faucet end whilst the filter cup is on the left side of the installer. The mounting collar is then screwed onto the faucet using only hands and no tools until snug.
- Insertion of filter cartridge into filter cup: The fitment of the filter cartridge for both the Basic and Complete filtration systems involves supporting the base system with the left hand and holding the filter cartridge with the right hand such that the insert groove aligns with the filter replacement indicator on the front of the base system. For both systems, inserting a new filter cartridge resets and activates the filter replacement indicator.
- Flushing the new filter cartridge with water: For both the Basic and Complete Water Filtration Systems, the new filter cartridge needs to be flushed for 5 minutes with cold water to remove the carbon dust and to activate the filter. The filter cartridge in both systems is able to filter about 100 gallons or 378 liters of water.
In a nutshell, for the Brita brand, the above steps explain How to Install a Water Filter.